httpvh://www.youtube.com/watch?v=n8wog8l98_w
Is Your Domain Transferable? Domain Lock & Authorization Codes
There are a few steps that have to take place to transfer a domain and it can get a little tricky.
STEP 1: Click here to see if the domain is transferable. Type in your domain name in the box and if it tells you the domain is NOT available for transfer, it’s probably because the domain name has been registered or transferred in the last 60 days. So you’ll just have to wait it out.
If it says your domain IS transferable, go ahead and purchase the transfer (STEP 3 below) to start the process.
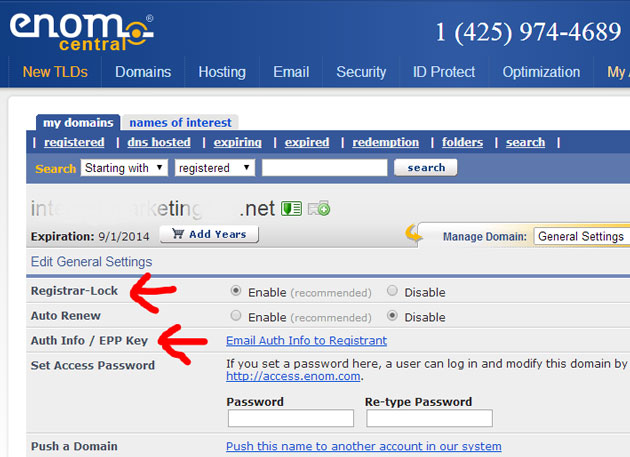
In order to complete a domain transfer, the domain needs to be unlocked. To unlock a domain go to the current registrar where the domain is managed and unlock it. You’ll have to find the “Registrar Lock” in the settings. See the screenshot below for an example. If the domain is managed by a third party and you don’t have access to it, you’ll need to contact the third party and ask them to unlock the domain.
Setting the Admin Contact
STEP 2: Find out who the administrative contact is for your domain. You can search in the WHOIS database for this info or the registrar where you purchased the transfer may give you this info. If the admin contact for your domain is one of your email addresses that you have access to, then this will be easy. The verification email discussed below will be sent to this email address and you can easily recover it.
If the admin email is an email address owned by a third party, like Vistaprint for example, you’ll have to contact them for the transaction ID and security code which will be sent to them by email.
Purchasing the Domain Transfer
STEP 3: Go ahead and purchase the transfer if you haven’t already. It’s usually under $10 and adds a year to your domain registration.
After you purchase the transfer, the verification email mentioned in STEP 2 will be generated, usually within a matter of minutes.
Authorizing the Domain Transfer
STEP 4: After you purchase the transfer and have recovered all the following codes, you’re ready to authorize the transfer:
Authorization code (EPP) from sending registrar (Login to registrar account to recover this.)
Transaction ID from verification email (from receiving registrar)
Security code from verification email (from receiving registrar)
Login to the receiving registrar account and follow the instructions to authorize the transfer using the codes above. If the authorization is accepted, there will be one more email sent to the domain admin email address and you’ll need to click the link to complete the transfer.
All done!
Instructions from Top Providers
These instructions will work for most domain registrars but are specifically written for transferring TO Godaddy. Here is a list of directions from top providers on transferring domains FROM them.
Transfer Domain Away from 1&1
Transfer Domain Away from Weebly
Transfer Domain Away from Vistaprint
Need More Help? Comment Below…
Every situation is different. Comment below if you have a question about your situation and I’ll do what I can to help.