httpvh://www.youtube.com/watch?v=YcoWQxV6CaU
WordPress 3.9 – A Love Hate Relationship
WordPress 3.9 offered a lot of great updates to working with images including allowing users to drop images right in the editor and also resize images right in the visual editor.
With all the improvements, there is one big complaint among a large segment of the WordPress community (the size of that group is debatable) and that is over the removal of the input boxes for borders and margin in the image editor.
In past versions of WordPress, you could simply type numbers into the boxes and the editor would automatically add the code for the margins and borders. Pretty useful.
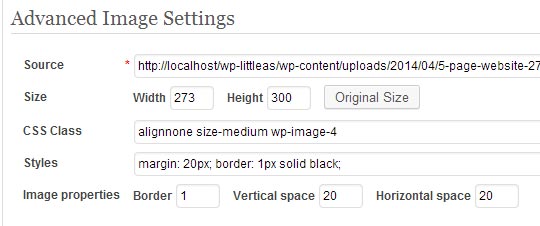
I went to edit an image after updating to 3.9 and was a little surprised that the margin and border boxes were no where to be found. So I googled it and found a number of people complaining in the WordPress forums.
You can add this functionality back with a plugin but who one wants to add ANOTHER plugin on top of the 20 plugins they have running already?
Watch my video above to see the solution I came up with. This is how I will be styling my images going forward and it’s the “best practice” way to do it. I think this is what the WordPress developers are hoping people will do. The change was made is to the resulting website code cleaner by removing the inline styling and instead putting the styling into the CSS code. You can still use inline styling the same way but you’ll have to enter the code manually. Here’s a good description of how to do that from BobWP
 Many WordPress beginners aren’t happy because they don’t know CSS and like WordPress because it makes things really easy. I can’t say I blame them because I felt the same way.
The big question is this – Is WordPress really a platform for beginners? I don’t think so. It does make building a website pretty easy but I always tell people that they are going to want to know HTML and CSS to get the most of out WordPress.
If you want a simple drag and drop interface for building your site, there are some great website builder platforms out there.
But for those who want to stick with WordPress, watch my video above for a simple method of creating a few CSS classes to cover the most common image styles that you use one your website.
Here’s the code that I use on the video.
.imgupright {margin: 0 0 20px 20px;}
.imgdownright {margin: 20px 0 0 20px;}
.imgdownleft {margin: 20px 20px 0 0;}
.img20 {margin: 20px;}
.img20zero {margin-top: 20px; margin-bottom: 20px;}
.imgzero20 {margin-right: 20px; margin-left: 20px;}
By adding this code to your CSS file, you will be able to utilize classes like “imgupleft” and “imageupright” to easily add the associated margins to your images. It can actually be easier than typing in borders and margins. You just need to decide beforehand what image styles you want to use and you can always add more classes to your CSS file in the future.