Check out my step-by-step video and read more below:
There are quite a few technical details that go into this process, but I’ll save those for another post. What I will focus on is how to get SSL on your site, which is more important than ever since Google Chrome is now flagging sites without SSL security.
There are a few different ways to activate SSL on your site, but for our purposes, I’m going to focus on the one I prefer for the sites I personally manage as it requires no long-term usage of WordPress plug-ins.
Recognizing If SSL Security Already Exists
For SSL security to function on your site, you need (1) the security certificate installed on your host and (2) HTTPS activated on your website.
I’m guessing if you’re reading this post, these 2 things are NOT already done on your site but you can check for yourself. Just go to your site in a browser and see if “http” or “https” appears before your site URL. Along with “s” in “https” you should also see a green padlock (and possibly the name of your organization) if you have an active SSL certificate that is properly activated on your site. If you’re seeing this, then you’re all good.

If you’re getting an security warning on the “https” version of your site, then you probably need to complete #1 and #2 above.
First, you need to determine if an SSL certificate is present on your host. And if not, you need to get one.
The simplest way to determine if an SSL certificate is present on your host and how to get one is to contact your web host directly and ask. Many providers offer free certificates along with your hosting. Others may offer certificates at an additional charge but likely have a simple, one-click feature to quickly activate it. I give some resources for free SSL certificates below.
Either way, you need to make sure an SSL certificate is installed on your host, then the next step is activating it on your website.
If your site loads the “https” secure version but the padlock disappears or “https” changes to “http” when you click around the site, then step #2 is not completed.
In this case, keep reading to the next section and I’ll show you how to take care of this problem.
Activating SSL On Your Website
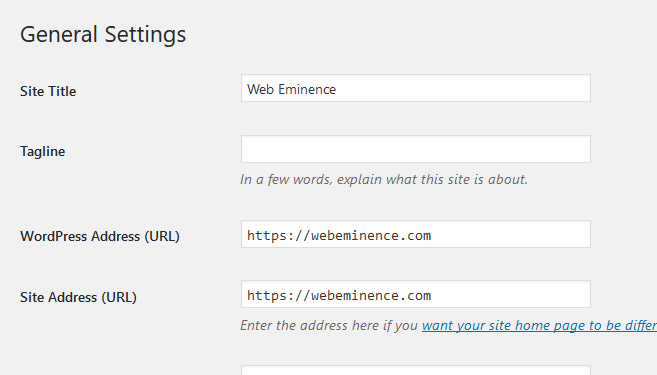
To make sure the SSL certificate is in use on your site, you can log into your WordPress dashboard and do a bit of work yourself. Go to SETTINGS >GENERAL and manually change the site address by adding the “s” after “http.”
Even with this change, you’re still not done. You’ll likely still see an info symbol or warning next to your URL in a browser that is alerting you that your site is not fully secure. This is like having that padlock hanging on your gate but not having it snapped together yet.
The One Plug-In You WILL Need
So, earlier I said no plug-ins, and I maintain that you won’t need any plugins installed permanently. This will be one-time use. No long-term commitments here!
Search & Replace
The plug-in I use is called Search & Replace by Inpsyde GmbH. Once installed the plug-in will appear under TOOLS in your WordPress dashboard. With it you can search for the “http” version of your domain and replace it with the “https” version. To actually complete the Search & Replace, select all tables, uncheck DRY RUN, “Save changes to Databases,” and click DO SEARCH & REPLACE.
If you’ve done it right, you should be able to refresh your live site and now have the green padlock icon and the word SECURE next to your URL.
WARNING – before you use the Search & Replace plugin, make sure you have a backup of your site and database!
Still Not Seeing The Green Padlock?
If you refresh your live site and are still getting the info box warning, there’s more research to be done. I would suggest going to the site WhyNoPadlock.com. By pasting in your URL, you’ll get a list of items that aren’t secure and can troubleshoot from there.
An Extra Level of SSL Security
You’ve done all the steps, your site appears secure, but there is still one more step. Think of this as making sure that no one can just come sneak through the back gate that is unlocked, because right now, people are still able to search your URL without the “s” at the end of “http” and still land on the unsecured site. We need to make sure that any time the URL is searched (even without the “s”) that people are redirected to the secure site. You can do this by editing your htaccess file.
WARNING: There are things that can go wrong when messing with this file, so it may be something you’ll want your host to work out for you.
You can get to your htaccess file in the cPanel File Manager. In the File Manager, you’ll go to SETTINGS and click SHOW HIDDEN FILES. Then you’ll see the htaccess file in the root folder of your site and dropping in a few lines of code is all you need to force that redirect. Feel free to follow along in our companion video to get a visual guide through the process and be shown right where to paste the code and where to change the domain name. On most sites, I’m able to add the bolded lines below. And don’t forget to change domain.com to your own domain!
# BEGIN WordPress

<IfModule mod_rewrite.c>

RewriteEngine On

RewriteCond %{SERVER_PORT} 80

RewriteRule ^(.*)$ https://domain.com/$1 [R,L]

RewriteBase /

RewriteRule ^index\.php$ - [L]

RewriteCond %{REQUEST_FILENAME} !-f

RewriteCond %{REQUEST_FILENAME} !-d

RewriteRule . /index.php [L]

</IfModule>

# END WordPress
Now your front gate is double-locked and reinforced. The only thing missing is a moat, but I’ll leave that up to you.
Free SSL Certificates
HTTPS is absolutely becoming the standard, so it’s something you need to consider before all the warnings scare away your visitors. Here are just a few suggestions of where you can find free SSL certificates, paid premium versions, and more info on SSL certificates in general.